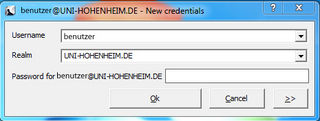
| >> | - After re-starting your computer the AFS client registration window opens.
- Check whether your Hohenheim user name is entered. In the field “Realm,” UNI-HOHENHEIM.DE should be entered.
- Now click in the lower right-hand corner on the field with the two arrows (>>).
|  |
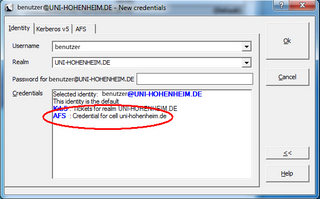
| >> | - Choose the tab “Identity”. In the field “credentials,” AFS: Credential for cell uni-hohenheim.de should be entered.
- If this is not the case, then change the parameters as described in the following steps.
|  |
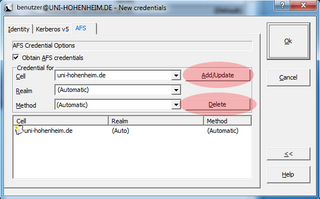
| >> | - In the same window, click on the tab “AFS.”
- In the field “Cell,” delete all entries: to do so, click on an entry and confirm the choice with “Delete.”
- In the field “Cell,” then write uni-hohenheim.de and save the entry with a click on “add/update.”
| 
|
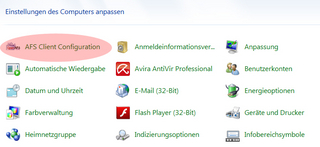
| - Then you still need to change the AFS options in the control panel (Desktop - start icon - control panel).
- In the control panel overview, first open “AFS Client Configuration.”
|  |
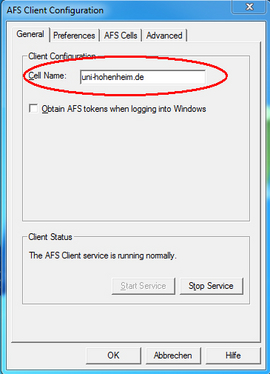
| - In the tab “General,” under “Cell Name,” the entry uni-hohenheim.de should be found.
- If this is not the case, please enter uni-hohenheim.de in the field “Cell Name” and save it with “OK.”
|  |
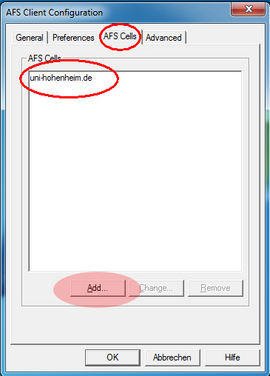
| - Then click on the tab “AFS Cells.” Here, as well, only uni-hohenheim.de should be entered.
- Delete additional entries by marking the entry and clicking on “remove.”
- If the entry “uni-hohenheim.de” is not yet there, add it using the field “add.”
- Make sure that uni-hohenheim.de is selected and then confirm with “OK.”
|  |
| - Then you can connect with the AFS client and add the AFS path as a drive.
- Follow the steps in the section “Adding AFS paths as drives“ to do so.
| |
