FAQ Webmail
Probably you have entered an incorrect password several times or you have changed your password but your browser still uses your old password. After several unsuccessful attempts your account will be blocked. This will be lifted after a while. Please try again later or contact us.
This can be seen by consulting the e-mails in the “sent-mail” folder.
In the new webmail it is part of the standard settings that the attachments are not saved with the e-mails in the “sent-mail” folder, as they usually exist as a file.
This setting can be changed:
Inbox (Posteingang)
Settings (Einstellungen)
New e-mail (Neue Nachricht)
Towards the end of the page you can find the question “"Sollen Anhänge mitgespeichert werden, wenn gesendete Nachrichten gespeichert werden?” (Should attachments be saved when sent e-mails are saved?)
You can find instructions for synchronizing webmail with various systems or devices on our page “forms, instructions, and downloads” in the area E-MAIL.
If you do not see any attachment in Webmail for your e-mail, then please do the following:
On the right-hand side of the e-mail, open the drop-down menu “Weitere Funktionen” (Additional functions) by clicking on it. Then choose the option “Alle Teile” (all sections).
Now on the left-side of your e-mail, you will see a paper clip. If you click on this symbol, you can see all of the attachments for the e-mail.
In order to open a certain file, please click on the title in the list.
1. Pick the address book you would like to keep. (Ex. “Address book from faeusttt")
To be on the safe side, export this address book locally on your computer.
2. Go to “Import / Export”.
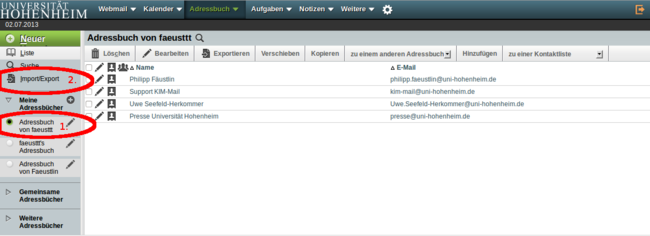
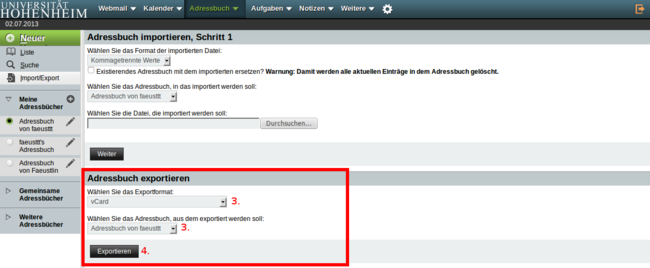
3. To export, please select “vCard” as the export form and choose the desired address book “Address book from faeusttt”.
4. Click “Exportieren” (export) and save the file (addresses.vcf).
5. Now you can delete the extra address books without worries since you have saved all addresses on your computer.
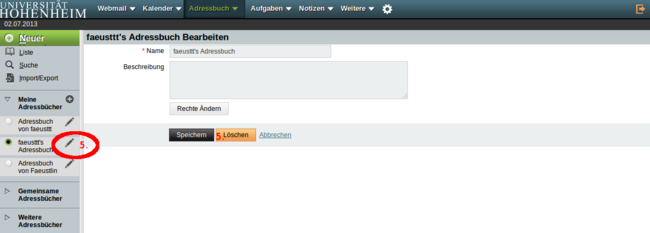
When you delete the extra address books, it is possible that the address book you wanted to keep is suddenly empty. That is why you exported it before starting.
>> If you have deleted all the extra address books and the address book you want to keep still has all the addresses, then you’re finished. <<
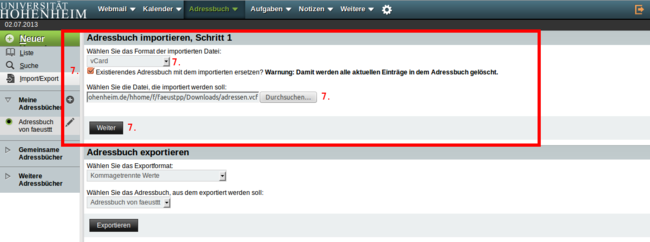
6. If the addresses were deleted, then you need to import them. To do so, go to “Import / Export” again.

7. Now choose the import format “vCard”, check the box for “replace address book” and choose the import file “addresses.vcf”.
Click next.
Done.

To change this, go to:
"Benutzereinstellungen” (user preferences) -> "Webmail" -> "Gesendete Nachrichten" (sent messages) ->
“Anhänge mit gesendenten Nachrichten speichern?” (save attachments with sent messages?)
In “Benutzereinstellungen” (user preferences) -> “Webmail” -> “Ordnerübersicht” (folder overview) -> “Erweiterte Einstellungen anzeigen” (show more preferences), you can check the box for “Information über Anhänge in der Nachrichtenliste anzeigen?” (Show information about attachments in the message list).
Then e-mails with attachments will be shown in the message list with a small paper clip in the first column.
Webmail will typically display the text message of an e-mail.
In order to view the HTML message as the standard view, go to “Benutzereinstellungen” (user preferences) -> “Webmail” -> “Anzeige” (display) -> “Erweiterte Einstellungen anzeigen” (Show more preferences).
Under “Welcher Nachrichtenteil soll angezeigt werden, wenn eine Nachricht alternative Textansichten hat?” (Which part of a message should be displayed when a message has alternative text views?), you can choose between “text message” and “HTML message”.
The button “Endgültig löschen” (delete permanently) can no longer be seen directly but can be found in Webmail above the e-mails or under “Sonstige” (other).
The signature is linked to the identity and is attached when you send the e-mail.
Currently, there is unfortunately no way to change the signature while you are writing the e-mail.
In order to attached different signature to e-mails, then under “Benutzereinstellungen” (user preferences) -> “Webmail” -> “Persönliche Angaben” (personal preferences), you can set up different identities with different signatures.
When writing an e-mail, you then select the identity with the appropriate signature.
You can set up a sent folder for each identity you have. That is, for each address from which you can send e-mails, you can set up a separate standard “sent folder”.
For each identity, at the bottom of the page, you can set this up under “Benutzereinstellungen” (user preferences) -> “Webmail” -> “Personal preferences”.
You can set how each folder is sorted individually by clicking above the e-mails on the text of the respective column according to which you want the e-mails sorted.
Then beside the text, an arrow will be shown pointing up/down, depending on the sorting direction ascending/descending.
Webmail will retain this sorting system for the folder until you change it again.
Example: I want to sort my e-mails in ascending order (newest on top) according to date.
Then I click on the word “date” until an arrow pointing up appears on the left of the word and wait a moment until the view has been updated.
The more e-mails there are in a folder, the longer it takes to re-sort them.
On this topic, see also:
> Which e-mails should be shown when you open a folder for the first time?
This can be individually configured in the user preferences.
Under “Benutzereinstellungen” (User preferences) -> “Webmail” -> Folder “Ordnerübersicht” (Folder overview), you can find the preferences for:
“Which e-mails should be shown when you open a folder for the first time?”
In this drop-down menu, there are several possibilities.
Check the address which you used to log in.
The error usually occurs if you call up the page using a bookmark which was created with the old version of Webmail.
In your browser, enter the following address: https://webmail.uni-hohenheim.de drectly and then create a new bookmark.
After you have logged out, a white screen and the message:
“A serious error has occurred:
vacation does not have an API.
Details have been recorded for the administrator.”
Please contact kim-mail@uni-hohenheim.de.
or call us at: 459 - 22838
In Webmail, you can use the button “Filtering” under “Webmail” to get to the configuration page.

Now you will see an overview of all existing filter rules. If you would like to set up forwarding, in the list of rules click on “Forwarding” (“Weiterleitung”).
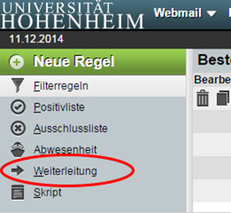
You can decide whether e-mails are to be deleted or saved to your webmail.uni-hohenheim.de account after being forwarded.
In the text field, you can enter the e-mail addresses to which the messages are to be forwarded. If you would like to save more than one address, please enter them on separate lines.
Click on “Save and Activate” (Speichern und Aktivieren) in order to activate forwarding.
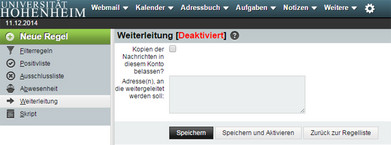
If you would like to set up both an out-of-office notification as well as forwarding, the rule that is used first is the rule that is higher on the list of rules. In order to change the order of rules, use the small arrows on the right-hand edge of the screen.

If you have set up forwarding before and would like to re-activate it, please click on the cross behind the rule “Forwarding” (Weiterleitung) in the column “Activated” (Aktiviert). A check mark should then appear, meaning that forwarding is activated.

In Webmail, you can use the button “Filtering” under “Webmail” to get to the configuration page.

Now you will see an overview of all existing filter rules. If you would like to set up a new out-of-office notification, in the list of rules click on “Vacation” (“Abwesenheit”).
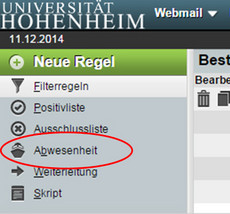
Set the start and end dates of your absence in order to have it automatically turn on and off. Otherwise the out-of-office notification is active as soon as you save the change. In this case, you will have to manually deactivate the notification when you no longer want it sent.
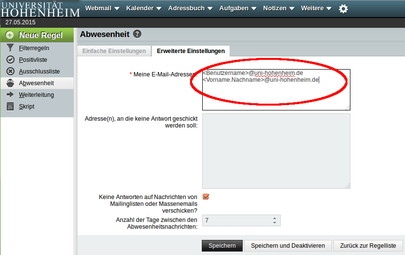
Now enter the subject and text of your out-of-office notification in the respective fields and change to the tab “Advanced settings” (Erweiterte Einstellungen).
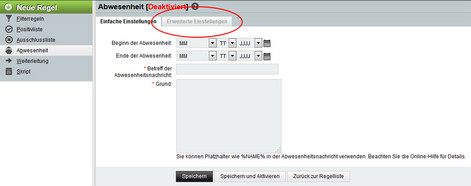
In the field “My e-mail addresses” (Meine E-Mail-Adressen) please enter your complete Hohenheim e-mail address in addition to your Hohenheim user name (username@uni-hohenheim.de).
If you would like, you can save addresses to which no out-of-office notification should be sent (one address per line). You can also define after how many days the mail sender should receive another out-of-office notification from you: the default setting here is one week, and we recommend that you don’t choose a setting of less than 3 days.
Then confirm your entries by clicking “Save” (Speichern) if you have set the start/end dates of your notification or “Save and Activate” (Speichern und Aktivieren) if you did not set any start/end dates.
If you would like to set up both an out-of-office notification as well as forwarding, the rule that is used first is the rule that is higher on the list of rules. In order to change the order of rules, use the small arrows on the right-hand edge of the screen.

If you have set up an out-of-office notification before and would like to re-activate it, please click on the cross behind the rule “Vacation” (Abwesenheit) in the column “Activated” (Aktiviert). A check mark should then appear. The out-of-office notification is activated as long as the start and end dates of the absence are not in the past.

When you write a message, use the left mouse button to click on “An:” (To), “CC:” or “BCC:”.
This will open a new, small window “Address Book”. There, you can search your address books and select the appropriate entries.
In the menu bar at the top, on the right-hand side of the screen, there is an orange button with an arrow pointing right.
This is the log-out button.
To do this, go to the user preferences in webmail.
There go to “Nachrichten löschen und verschieben” (Delete and move mails).
There you can choose the option “Beim Löschen von Nachrichten diese in den Papierkorb verschieben, anstatt sie als gelöscht zu markieren?” (When deleting messages, move them to the recycle bin instead of marking them as deleted?).
After clicking and saving, you then need to select the appropriate folder as the recycle bin.
Then save again.
Deleted e-mails are shown with a line through them.
In the line above the e-mails under “Sonstige” (Other), you can select “Verstecke gelöschte” (hide deleted) to remove them from view.
Do you have questions or comments about this site? contact form
